
How to Organize Storage Bins & Totes in Your Garage
Practical garage organization ideas from someone who moved a whole storage unit into one — so you can find anything without opening every lid.
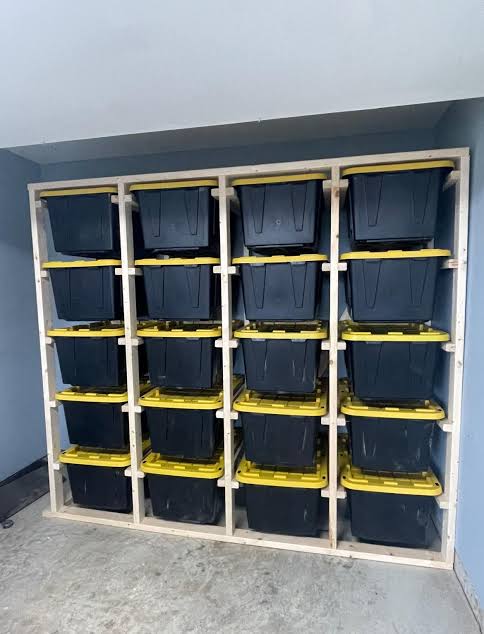
The real problem: which bin is it in?
Most garages don't fail because there aren't enough totes. They fail because nobody remembers what went into which one. You end up pulling down five bins to find one extension cord.
A good system answers one question fast: where is the thing I need right now?
Start with zones
Group bins by what they hold, and give each group its own spot: tools and hardware, seasonal and holiday, sports and camping, car care, keepsakes.
Put what you use every week at waist height near the door. Holiday decorations and keepsakes can go up high or in the back.
Stacking totes without the avalanche
Use the same size and brand of tote in each stack so lids lock together. Mixed sizes slide and topple.
Keep heavy bins on the bottom and stacks to a height you can lift down safely. Leave a small gap between stacks so you can grab one without moving its neighbors.
Clear bins help a little, but once they're stacked you mostly see the lid and the bin in front.
Storage bin labels that actually work
Name bins so anyone could find them: "Garage – Christmas lights" beats "Bin 1". Put the label on the short end that faces out, not only the lid.
Handwritten labels are free and quick, but they can't list everything inside, and they go stale when contents change.
Numbered labels with a list somewhere else work well — as long as the list is on your phone, not a notebook in the house.
QR labels let anyone scan a bin to see what's inside. Be careful when shopping: many QR label products advertise "free" and turn into a monthly subscription to see your own list.
Keep the list where you are
The best inventory is the one on your phone. Take a photo of what goes into each bin as you pack it, then you can search for "drill bits" or "tent stakes" instead of opening lids.
Photo tips
How to take photos for Pegboard
Each lesson shows the same items photographed two ways, with what the scanner actually found. Pick the style that gives you the list you want.
Which camera should I use?
Belongings: your phone's Camera app. Take bin, drawer and clothing photos there first, then choose them from your photo library in Pegboard. Your phone keeps the originals as a backup for insurance or another scan.
Receipts: Pegboard's camera button. Receipts can show part of your card number. Use the in-app camera when you don't need a separate copy in your photo library. Whether a copy is saved depends on your phone and camera settings; check your photo library if needed.
Real photos, real results. None of these photos were made or edited digitally. They were taken on an iPhone camera of real items from our own home, and the results are exactly what the scanner returned, including its mistakes. Even good photos miss a few things, so expect to check each list and make small fixes.
How Pegboard's scanner sees your photo
- It looks, it doesn't search. The scanner names things from what it can see in the photo, like a friend glancing at your shelf. It doesn't look anything up on Google or other websites.
- If you can't read it in the photo, it's guessing. Blurry, dark or hidden labels lead to general names or wrong guesses.
- Barcodes are different. Scanning a barcode looks up the exact product, so use it for anything still in its package.
Stumped by an item? Your phone has a free picture search built in. On iPhone, open the photo in Photos and tap the info button with the sparkle, or use Google Lens in the Google app. On Android, open the photo and tap Lens. Then type the name it finds into Pegboard.
Spread things out instead of piling them
Dumped on the lid in a pile
What Pegboard found
- 10 entries
- Several cords merged into one entry
What it got wrong or missed
- Most small items hidden under the pile
Laid out across two photos
What Pegboard found
- 29 entries
- Told apart 4 different RCA cables by color
- Named older phone gear and a hands-free headset
What it got wrong or missed
- Called a VTech phone part Uniden (a near-identical look-alike)
- A few cords bundled together still counted as one
- Some values left at $0
Takeaway: A pile hides most of what's in it. Even a quick spread across a bin lid, with cords untangled, gives each item its own line.
Turn packages face-up
Packages face-down
What Pegboard found
- Generic names, no pack counts
What it got wrong or missed
- 3 wrong guesses
- Showed "Closer photos needed"
Labels facing the camera
What Pegboard found
- About 10 of 11 packages named correctly
- Brands, models and pack counts, like Hillman drywall anchors
What it got wrong or missed
- A soldering tip in a bag was misread from the bag's label
- An empty box was still listed as if full
Takeaway: The front of a package has the brand, model and count. Face-down, Pegboard has to guess.
Small parts: count them or keep them boxed
One photo, both ways: each container along the back holds the same kind of part laid out loose in front of it.
Kept in their box or jar (back row)
What Pegboard found
- One entry per container
- Read brands and pack counts from labels, like Hillman 1" roofing nails
What it got wrong or missed
- Can't count loose parts inside a jar
- Listed the empty green box and the jar as items too
Spread out loose (front)
What Pegboard found
- Counted each kind: 24 wood screws, 10 roofing nails, 5 drywall anchors, 3 machine screws, 2 drywall screws
- Told apart screws, nails and anchors
What it got wrong or missed
- Parts touching each other can be counted as one
- Didn't know which loose parts came from which box
Takeaway: Both ways work. Leave parts in their box or jar for one quick entry, or spread them out, not touching, when you want Pegboard to count every piece.
One shelf per photo (if you use map levels)
Whole cabinet in one photo
What Pegboard found
- 26 entries
- Good enough if you don't track shelves
What it got wrong or missed
- Missed a mug hidden at the back
- Included items from the spot next to the cabinet
- Stacks counted as one entry
One photo for each shelf (1 of 3 shown)
What Pegboard found
- 29 entries across 3 photos
- More specific names
- Found the hidden souvenir mug
What it got wrong or missed
- Stacks still counted as one entry
- Small label text unreadable
Takeaway: A shelf-by-shelf photo keeps each item on the right level and reads smaller things. Keep the next spot's items out of the frame.
Turn on a light, or use the flash
Pitch-black garage
What Pegboard found
- Refused: "Too dark to scan" (no scan used)
Same bin with the flash on
What Pegboard found
- 8 books found
- Clearer titles than with the garage light (7) or an open door (5)
What it got wrong or missed
- Missed books covered by others
- Called a spiral binding the wrong thing
Takeaway: Pegboard warns you when a photo looks dark, and won't scan one that's pitch black. In a garage, attic or basement, the flash helped most.
Fill the frame
Shot from a few steps away
What Pegboard found
- 11 entries
What it got wrong or missed
- 5 were things around the bin, like buckets and a hose
Close and from above
What Pegboard found
- 20 entries
- Nothing outside the bin added
What it got wrong or missed
- Homemade craft items got different names in different photos
- Only the top layer can be seen
Takeaway: Stand close and shoot from above so the bin fills the photo. Far shots find less and pick up things around the bin.
Clothes: individual pieces or simple groups
Real photos and results for this lesson are coming soon.
Takeaway: Add clothing photos through Locations. Lay garments flat with designs facing up for separate entries; touching edges are fine if each piece is visible. Clearly distinguishable pieces in a stack can also stay separate. Hidden piles stay grouped without a guessed count. Socks can stay in the drawer: each visible style gets a group, and you can enter the number of pairs yourself.
Shelves, counters and dressers: no lid needed. When there's no bin in the photo, Pegboard lists everything on the surface and only skips things far in the background.
Keeping it simple? You don't have to stage anything. A clear, well-lit photo of a whole cabinet or closet still gives a good list. These tips are for people who want every item named and counted, or who use map levels.
"Closer photos needed" is only a suggestion. Pegboard shows it whenever a photo is busy, even when the list came out nearly right. If the list looks good, or you typed in the few things it missed, tap Done · clear and call that location finished. Your list matters more than the reminder.
Do it the easy way with Pegboard
- Photograph a bin's contents and Pegboard lists the items for you.
- Search "drill bits" and see exactly which bin holds them.
- Pin each stack on a map of your garage, down to which level in the stack.
- Print QR labels — scan one to see what's inside without opening it.
- Share one inventory with everyone in your household.
Free to download. No ads, and we never sell your data.
Start your inventoryInsurance guide · Tested supplies · Support · Privacy Policy